Chapter 3. Basic Usage
This chapter contains common information about the configuration files and directories used in Penrose Studio and information on basic server configuration options, such as starting and stopping the server, establishing secure connections, and changing the root user and host information.
3.1. Starting the Service
Penrose Server is started by running a shell script, vd-server.sh, in the /opt/vd-server-2.0/bin directory. For example:
cd /opt/vd-server-2.0/bin

./vd-server.sh
PenroseServer        [ 126] Penrose Server is ready.
To stop the server, simply close the script.
3.2. Configuring Penrose Server to Run as a Service
Penrose Server can also stopped, started, and restarted using system tools on Red Hat Enterprise Linux. Init scripts are included with the configuration files with Penrose Server. and then copy them over to the /usr/sbin directory.
Log into the Penrose Server host machine as the
rootuser.Open the Penrose Virtual Directory init script directory.
cd /opt/vd-server-2.0/etc/init.d
Edit the
vd-serverscript so that the Penrose Server home and script locations are correct. For example:VD_SERVER_HOME=/opt/vd-server-2.0 VD_SERVER_SCRIPT=$VD_SERVER_HOME/bin/vd-server.sh
Copy the init file to the
/etc/init.ddirectory.cp /opt/vd-server-2.0/etc/init.d/vd-server /etc/init.d
Make the init script executable.
chmod +x /etc/init.d/vd-server
Test the new Penrose Virtual Directory service.
service vd-server start
After setting Penrose Server up as a service, it can be managed using the service on Red Hat Enterprise Linux:
service vd-server {start|stop|restart}3.3. Configuring Penrose Server Host System Properties
The system properties for Penrose Virtual Directory define the connection information to access the Penrose Server. This is used by clients such as Penrose Studio and LDAP browsers.
3.3.1. Configuring the Host System Properties in Penrose Studio
To set the host system information in Penrose Studio:
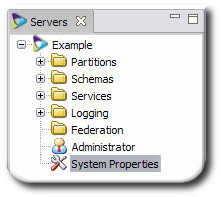
Click the System Properties link at the bottom of the server navigation window.
Click the Add button to add new system properties, or select and existing property and click Edit to change it.

Fill in the properties and values.
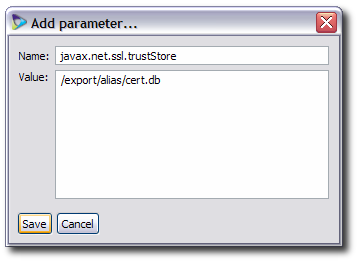
The hostname (
java.rmi.server.hostname) is required. There are four optional parameters, which are set in pairs:javax.net.ssl.trustStoreandjavax.net.ssl.trustStorePwd, which give the path to the server's certificate database and the password to access the database.http.proxyHostandhttp.proxyPort, which give the hostname and port of a proxy web server to use to access the server.
3.3.2. Configuring the Host System Properties in the Configuration File
The main file for configuring the Penrose service is server.xml in the /opt/vd-server-2.0/conf directory. This file defines important parameters such as the Java system properties, adapters, and the server's root user.
NOTE
The server.xml file is only loaded when the Penrose Server starts, so the server must be restarted after any changes to this file.
The Java properties define the host connection information, and the information set in the server.xml file are automatically loaded when Penrose Server starts. These properties include the host's connection information.
For example:
<server>

  <system-property>
    <property-name>java.rmi.server.hostname</property-name>
    <property-value>server.example.com</property-value>
  </system-property>

</server>
The java.rmi.server.hostname system property allows Penrose Studio to connect to Penrose Server.
| Property | Description |
|---|---|
| java.rmi.server.hostname |
Used by JMX clients to connect to Penrose Server; the default value is localhost and must be changed to the full hostname of the server.
|
| javax.net.ssl.trustStore | Contains the path to the certificate database for Penrose Server. |
| javax.net.ssl.trustStorePwd | Contains the password to access the certificate database. |
| http.proxyHost | Contains the hostname of an HTTP proxy server. |
| http.proxyPort | Contains the port number of an HTTP proxy server. |
Table 3.1. Penrose Server Java System Properties
3.4. Setting up the Admin User
The root user for Penrose Server has full access to the Penrose Server application. LDAP clients which bind to Penrose Server as the configured root user bypass all access control settings for the virtual directory; therefore, any management clients, including Penrose Studio, must bind to the Penrose Server as the (Penrose Server) root user.
3.4.1. Editing the Admin User in Penrose Studio
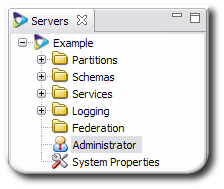
Click the Administrator link at the bottom of the server navigation window.
Change the admin user's name or password in the appropriate fields.

The root DN can be any valid distinguished name (DN), and this DN does not have to be present in the virtual directory tree. The default root DN is
uid=admin,ou=system, and the default password issecret.
3.4.2. Editing the Admin User in the Configuration File
Like the host system properties, the root user is configured in the /opt/vd-server-2.0/conf/server.xml file.
The root DN can be any valid distinguished name (DN), and this DN does not have to be present in the virtual directory tree. The default root DN is uid=admin,ou=system, and the default password is secret.
For example:
<server>

  <root>
    <root-dn>uid=admin,ou=system</root-dn>
    <root-password>secret</root-password>
  </root>

</server>
3.5. Configuring and Viewing Logs
There are three logs kept by Penrose Server:
Access logs
Error logs
Debug logs
These logs are stored in the /opt/vd-server-2.0/logs directory. Since these files apply to access to Penrose Server and Penrose Studio, one set of log files is kept, regardless of the number of partitions.
The log configuration file is located in the configuration directory, /opt/vd-server-2.0/conf.
3.5.1. Configuring Log Settings
The logging parameters for all logs are configured in the log4j.xml file in the /opt/vd-server-2.0/conf directory. Several parameters can be set for the logs individually, including the file location, maximum file size, and the number of backup files to keep. The parameters are listed in Table 3.2, “log4j Parameters”.
NOTE
All three log files — access, error, and debug logs — have the same configuration parameters available to them.
| Parameter | Description | Example |
|---|---|---|
| File |
Gives the path, relative to the /opt/vd-server-2.0, of the log file.
| param name="File" value="logs/access.log" |
| MaxFileSize | Sets the threshold for the log file before beginning a new log file. | param name="MaxFileSize" value="10MB" |
| MaxBackupIndex | Sets the number of old log files to keep as archives. | param name="MaxBackupIndex" value="100" |
| ConversionPattern |
Sets the pattern to use in the log entries, both for the timestamp and the log message. This parameter is set within <layout> tags.
| param name="ConversionPattern" value="[%d{MM/dd/yyyy HH:mm:ss}] %m%n" |
Table 3.2. log4j Parameters
For example:
  <appender name="access" class="org.apache.log4j.RollingFileAppender">
    <param name="File" value="logs/access.log"/>
    <param name="MaxFileSize" value="10MB"/>
    <param name="MaxBackupIndex" value="100"/>
    <layout class="org.apache.log4j.PatternLayout">
      <param name="ConversionPattern" value="[%d{MM/dd/yyyy HH:mm:ss}] %m%n"/>
    </layout>
  </appender>
3.5.2. Access Logs
The access logs record every transation that is performed through Penrose Server on the virtual directory or its sources. The access log entry has the following general format:
[date timestamp] session_ID type_of_operation operation_details
The session_ID gives the number for the connection thread.
There are several different types of transaction logged in the access log:
CONNECTshows the initial connection. The operation details include the IP address of the client, the IP address of the Penrose Server host, and the protocol used to connect to the server (either LDAP or JMX).BINDshows that a user has authenticated to the server when the session was opened. This contains the DN of the user.After the initial log entry for the
BINDoperation, the result is shown in theresult=tag and then the DN which connected (authDN).SEARCHshows the search details for a search of the virtual directory. This contains the base DN, scope, and filter for the search, as well as the entry attributes returned.After the initial log entry for the
SEARCHoperation, the result is shown in theresult=tag and, for a successful operation, the number of entries returned.DISCONNECTshows when the connection is closed.
For example:
[10/29/2008 12:47:31] session="5" - CONNECT from="192.168.123.122" to="192.168.123.121" protocol="LDAP"
[10/29/2008 12:47:31] session="5" - BIND dn="uid=admin,ou=system"
[10/29/2008 12:47:31] session="5" - BIND result="Success" authDn="uid=admin,ou=system"
[10/29/2008 12:47:33] session="5" - SEARCH base="dc=example,dc=com" scope="one level" filter="(objectClass=*)" attrs="*,+"
[10/29/2008 12:47:45] session="5" - SEARCH result="Success" entries="2"
[10/29/2008 14:58:59] session="5" - DISCONNECT
Example 3.1. Access Logs
3.5.3. Error Logs
The error logs have a more simple format than the access logs, showing the time of the error and the error message.
[date timestamp] error_message
Many error messages contain Java exceptions, which can indicate which areas of the Penrose Virtual Directory service have a problem. For example:
[10/08/2008 19:19:40] An error occurred while attempting to calculate a SHA-1 digest of file /usr/local/penrose-server-2.0RC2/services/OpenDS/config/config.ldif:  SHA-1 MessageDigest not available (GetInstance.java:158 Security.java:691 MessageDigest.java:145 ConfigFileHandler.java:773 ConfigFileHandler.java:274 DirectoryServer.java:1190 DirectoryServer.java:1139 OpenDSLDAPService.java:66 Service.java:54 ServiceManager.java:113 PenroseServer.java:119 PenroseServer.java:307)
org.opends.server.types.InitializationException: An error occurred while attempting to calculate a SHA-1 digest of file /usr/local/penrose-server-2.0RC2/services/OpenDS/config/config.ldif:  SHA-1 MessageDigest not available (GetInstance.java:158 Security.java:691 MessageDigest.java:145 ConfigFileHandler.java:773 ConfigFileHandler.java:274 DirectoryServer.java:1190 DirectoryServer.java:1139 OpenDSLDAPService.java:66 Service.java:54 ServiceManager.java:113 PenroseServer.java:119 PenroseServer.java:307)
        at org.opends.server.extensions.ConfigFileHandler.initializeConfigHandler(ConfigFileHandler.java:278)
        at org.opends.server.core.DirectoryServer.initializeConfiguration(DirectoryServer.java:1190)
        at org.opends.server.core.DirectoryServer.initializeConfiguration(DirectoryServer.java:1139)
        at org.safehaus.penrose.opends.OpenDSLDAPService.init(OpenDSLDAPService.java:66)
        at org.safehaus.penrose.service.Service.init(Service.java:54)
        at org.safehaus.penrose.service.ServiceManager.startService(ServiceManager.java:113)
        at org.safehaus.penrose.server.PenroseServer.start(PenroseServer.java:119)
        at org.safehaus.penrose.server.PenroseServer.main(PenroseServer.java:307)
Example 3.2. Error Logs
3.5.4. Debug Logs
The debug log contains all of the information recorded in the access and error logs, including all of the error message output and bind attempts, and additional information, such as notices on when the server starts and stops.
The format of the debug log is slightly different than the access or error logs. The log entry references only the Java file and line number which is accessed, then a message. The message can be relatively short or very long, depending on the response from the server.
Java_class [source_line_number] message.
For example:
PenroseServer        [ 147] Penrose Server has been shutdown.
PenroseServer        [ 126] Penrose Server is ready.
Example 3.3. Debug Logs
3.6. Configuring Penrose Virtual Directory for SSL
SSL can be configured two ways for Penrose Server. Front-end SSL means that Penrose Server uses SSL-secured connections to communicate with its OpenDS client services. Back-end SSL means that Penrose Server uses SSL-secured connections to communicate with LDAP and JDBC data sources.
3.6.1. Configuring SSL for Backend Sources
NOTE
The source must be configured to run over SSL as well for Penrose Virtual Directory to connect to it using SSL.
Configure the source to run in SSL.
Configure the connection for the source, as described in Chapter 6, Configuring Connections, with the protocol and ports set for SSL.
When the source is configured for SSL, an SSL client certificate is issued to the source. This certificate has to be imported into Penrose Server's certificate database for Penrose Server to connect to the source over SSL.
Export the source's SSL client certificate to a PEM or PKCS #12 file.
Open the Penrose Server configuration directory.
cd /opt/vd-server-2.0/conf
Import the certificate into the certificate database. This can be done using tools like
certutilorkeytool, depending on how the database was created. For example:keytool -import -trustcacerts -alias mydb -file certificate.pem -keystore conf/cacerts Enter keystore password: secret Owner: CN=source1.example.com, OU=Engineering, L=Raleigh, ST=North Carolina, C=US Issuer: CN=mydb, OU=Engineering, L=Raleigh, ST=North Carolina, C=US Serial number: 499ee484 Valid from: Fri Feb 20 11:12:36 CST 2009 until: Thu May 21 12:12:36 CDT 2009 Certificate fingerprints: MD5: 37:45:60:73:A8:DD:BB:1D:C0:7A:F3:82:49:99:B9:04 SHA1: CE:2C:21:D4:91:D1:7E:94:92:29:24:33:EE:59:06:DD:F0:B5:B8:EA Trust this certificate? [no]: yes Certificate was added to keystoreEdit the
server.xmlfile. Add two parameters,javax.net.ssl.trustStoreandjavax.net.ssl.trustStorePassword, to give the location and password to access the certificate database.<system-property> <property-name>javax.net.ssl.trustStore</property-name> <property-value>conf/cacerts</property-value> </system-property> <system-property> <property-name>javax.net.ssl.trustStorePassword</property-name> <property-value>secret</property-value> </system-property>
To verify that SSL is properly configured for the backend, open Penrose Studio and open the source. If the source opens and can be browsed, then SSL is working.
3.6.2. Configuring SSL for Frontend Services
Request or generate a certificate for Penrose Server to use.
Penrose Server supports a JKS or PKCS #12 certificate. Certificates can be request from a third-party authority or can be self-generated using a tool such as
keytoolorcertutilandpk12util.However the certificate is generated, make sure to use the hostname of the Penrose Server host machine as the common name (
CN) part of the certificate.For example, this generates a JKS certificate:
keytool -genkey -keyalg RSA -alias server-cert -keystore conf/keystore
Enter keystore password:
Re-enter new password:
What is your first and last name?
  [Unknown]:  server.example.com
What is the name of your organizational unit?
  [Unknown]:  Engineering
What is the name of your organization?
  [Unknown]:  Example Corp.
What is the name of your City or Locality?
  [Unknown]:  Raleigh
What is the name of your State or Province?
  [Unknown]:  North Carolina
What is the two-letter country code for this unit?
  [Unknown]:  US
Is CN=server.example.com, OU=Engineering, O=Example Corp., L=Raleigh, ST=North Carolina, C=US correct?
  [no]:  yes

Enter key password for <server-cert>
        (RETURN if same as keystore password):
For more information on
keytool, see http://java.sun.com/j2se/1.3/docs/tooldocs/win32/keytool.html.Edit the front-end service to support SSL. The only service which currently supports SSL for Penrose Server is the OpenDS service.
Open the OpenDS directory.
/opt/vd-server-2.0/services/OpenDS/config/
Copy the keystore from the Penrose Server
confdirectory to the OpenDS service configuration directory.cp /opt/vd-server-2.0/conf/keystore .
In the OpenDS service configuration directory, there is a file called
keystore.pin. Add the password for the keystore database to this file. For example:echo secret > keystore.pin
The OpenDS
config.ldiffile. This contains entries which enable and configure SSL for the service.vim config.ldif
The OpenDS
config.ldiffile has an entry for a JKS key manager and a PKCS #12 key manager. Edit the appropriate entry so that it is enabled, depending on the type of certificate created. For example:dn: cn=JKS,cn=Key Manager Providers,cn=config objectClass: ds-cfg-file-based-key-manager-provider objectClass: ds-cfg-key-manager-provider objectClass: top ds-cfg-key-store-type: JKS cn: JKS ds-cfg-key-store-file: config/keystore ds-cfg-key-store-pin-file: config/keystore.pin
ds-cfg-enabled: trueIf necessary, edit the other parameters in the entry to make sure it matches the certificate information. Make sure the directories given for the keystore and PIN files are relative to the OpenDS service directory, not the Penrose Server home directory.
To accept client certificates, make sure the blind trust entry is enabled.
 dn: cn=Blind Trust,cn=Trust Manager Providers,cn=config
 objectClass: ds-cfg-blind-trust-manager-provider
 objectClass: top
 objectClass: ds-cfg-trust-manager-provider
 cn: Blind Trust
 ds-cfg-enabled: true
Make sure that LDAPS connections are allowed. The entry should be enabled, SSL should be allowed, and Start TLS should be denied. Additionally, the certificate nickname in the entry should match the nickname of the certificate generated for Penrose Server.
dn: cn=LDAPS Connection Handler,cn=Connection Handlers,cn=config ..
snip...ds-cfg-allow-start-tls: falseds-cfg-listen-address: 0.0.0.0 ds-cfg-use-tcp-keep-alive: true ds-cfg-ssl-cert-nickname: server-cert ..snip...ds-cfg-enabled: true..snip... cn: LDAPS Connection Handler ..snip... ds-cfg-listen-port: 636 ..snip...ds-cfg-use-ssl: true
Restart Penrose Server.
service vd-server restart
The Penrose Server certificate has to be available in the certificate database of any LDAP tools used to manage Penrose Server. For example, for OpenLDAP tools:
For a self-signed certificate, export a PEM file.
keytool -export -alias server-cert -keystore conf/keystore -file penrose.pem -rfc
Import the certificate into the certificate database, such as the default
cacerts.cp penrose.pem /etc/openldap/cacerts c_rehash /etc/openldap/cacerts
To use OpenLDAP's LDAP client tools with Penrose Server, edit the OpenLDAP configuration file,
ldap.conf, to recognize Penrose Server's certificate.vim /etc/openldap/ldap.conf TLS_CACERTDIR /etc/openldap/cacerts
To test the frontend SSL configuration for Penrose Server, run an ldapsearch using the secure port, 636, and the secure protocol, ldaps.
ldapsearch -H ldaps://localhost:636 -x -b "" -s base
If SSL is properly configured the search returns the root DSE for Penrose Server.
3.7. Running Penrose Server Outside a Firewall
Penrose Server can run outside a firewall for additional network security, but, in that case, the firewall must be configured to allow access for the different client ports required for Penrose Server.
| Port Number | Client Description |
|---|---|
| 1099 | An RMI port used by Penrose Studio. |
| 40888 | An RMI transport port used by Penrose Studio. |
| 8122 | A web port used by web browsers. |
| 10389 | The LDAP standard port used by directory services. |
| 10636 | The LDAP secure (SSL) port used by directory services. |
NOTE
The ports used by these services can be changed; see Chapter 12, Using Services with Penrose Virtual Directory. Before changing the services ports or firewall settings, make sure that the client itself is configured to use a different port number.