Chapter 9. Mapping Entries and Attributes
Many forms of mapping described in Chapter 8, Configuring the Virtual Directory depend on having common attribute values which can be matched and mapped to define virtual entries. Some infrastructure situations do not have that consistency of data. In other situations, Penrose Virtual Directory is a bridge for migrating from one kind of data storage (NIS servers) to another (LDAP servers). In both of those scenarios, Penrose Virtual Directory provides an additional way to link entries, called identity federation.
9.1. Planning How to Map Entries
The next step is to define how the individual entries (leaves on the tree) are created. Again, there are many options, which can all be used depending on the type of information which is in the sources and the kind of information that should be included in the virtual directory entries.
Penrose Virtual Directory has several different mapping styles: basic, nested, joined, and identity linking, described in the sections below. These mappings are applied to the attributes for each identity, so any or all of the different mapping styles can be applied to any attribute, entry, or data source (though there can only be one mapping per attribute per source).
9.1.1. Basic Mapping
This simplest mapping is basic mapping, which is a one-to-one mapping of attributes. For example, if a users table in a database has an employee's username, first name, last name, and password, the mapping entry can simply convert the tuples to the cn, givenName, sn, and userPassword LDAP attributes.
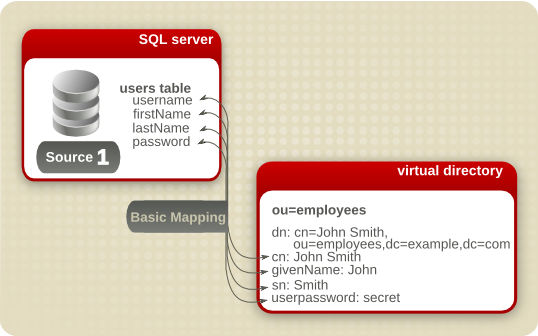
Figure 9.1. Basic Mapping
Basic mapping is configured in the directory.xml file for the partition, as described in Section 9.3, “Configuring Basic Mapping”.
9.1.2. Nested Mapping
A nested mapping is a dynamic entry created beneath another dynamic entry. In this case, the generated entry for the first entry is used as input for the second dynamic entry.
Each of the dynamic entries has its own source defined, and the content of these sources is joined when the entries are processed. The scope of the values for the second entry is restricted to areas where its source overlaps with the information in the first source.
For example, a parent entry is created which generates user entrys (uid=...). Its child entry generates a list of group entries (cn=...) which the user belongs to. The user entry is generated first, and the possible group entries under that user are limited to groups in the second source which that user belongs to.
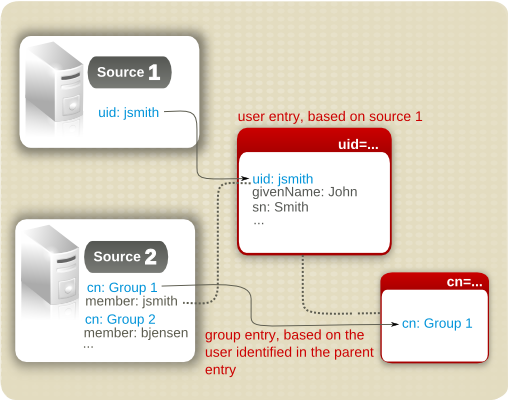
Figure 9.2. Nested Mapping
Nested mapping is configured in the directory.xml file for the partition, as described in Section 9.4, “Configuring Nested Mapping”.
9.1.3. Joined Mapping
Basic mapping is very simple correlation between attributes, but it doesn't handle correlations between entries. Many environments have multiple applications, and each entity has a different entry in each application. Penrose Virtual Directory can combine these separate entries into a single virtual directory entry.
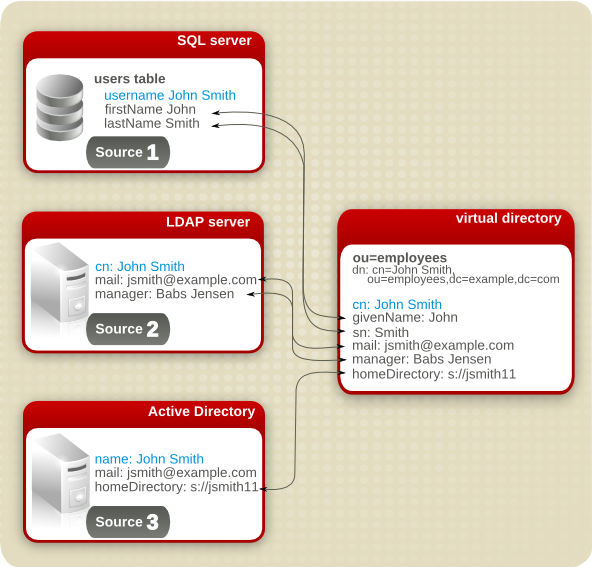
Figure 9.3. Join Mapping to Merge Entries
Join mapping can also be used to create new entries from two existing entries. For example, if one database holds user information (including group membership) and another holds group names and descriptions, Penrose Virtual Directory can create a new entry in the virtual directory.
For join mapping, a common attribute, a key, has to exist on all of the sources so that the entry in both sources can be linked from in one source to another. One of these sources is the primary key, which determines whether the entity exists on any of the other sources. The joined entry is dependent on the primary key, and if that primary key value does not exist in the primary source, then the entry will no show up in the virtual directory.
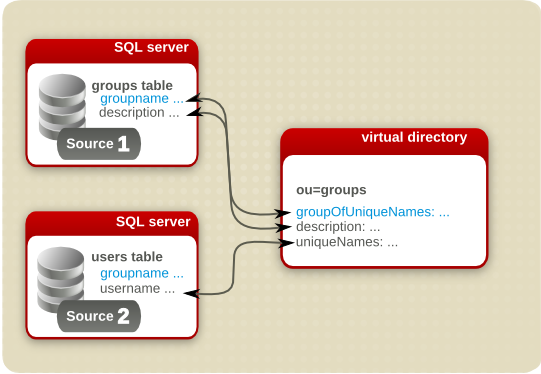
Figure 9.4. Join Mapping to Create New Entries
Join mapping is configured in the directory.xml in the directory entry, as described in Section 9.5, “Joining Entities into a Single Virtual Entry”.
9.2. Creating a Single Subtree from Multiple Sources
The same kind of information can be contained in multiple sources, such as having employee information spread out with authoritative sources at each branch office or distributing the load across several databases for high-traffic systems. It makes sense to design the virtual directory tree according to those data groups. For example, creating subtrees for all employee data, for all customer data, for servers, and for other kinds of infrastructure, such as buildings and conference rooms. If the same identities are not stored in different locations, only the same kind of entries, then the mapping is as simple as mapping each source to the same subtree.
IMPORTANT
A separate subtree entry needs to be created for every source which is merged into the subtree is because of how the attributes are mapped. Multi-valued attributes can be mapped to multiple sources; however, many required attributes, such as uid, are single-valued. This means that there has to be a separate entry to allow more than one source to supply the attribute.
In Penrose Studio, create a new subtree entry with the same name for each source, as shown in Figure 9.5, “Two Entry Mappings under ou=People”. In this case, two dynamic entries are created for the cn="..." entry under the the ou=People,dc=example,dc=com subtree. Creating subrees is described in Section 8.2.1, “Creating the Virtual Directory in Penrose Studio”.
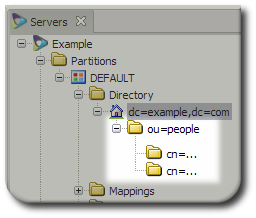
Figure 9.5. Two Entry Mappings under ou=People
To create the entries mapping manually (as in Section 8.2.3, “Configuring the Virtual Directory Manually”, add entries with the same dn= value (the same entry name) and a different <source> entry, pointing to each source being merged into the subtree. As a simplified example, Example 9.1, “Merging User Database and LDAP Entries into a Virtual Directory” combines employee entries from a database (MySQL1) and a Red Hat Directory Server instance (LDAP1) into the virtual ou=People,dc=example,dc=com subtree.
<entrydn="uid=...,ou=People,dc=example,dc=com"> <oc>person</oc> <oc>organizationalPerson</oc> <oc>inetOrgPerson</oc> mapping <at name="uid" rdn="true"> <variable>MySQL1.username</variable> </at> reverse mapping <source name="MySQL1"> <source-name>MySQL1</source-name> <field name="username"> <variable>uid</variable> </field> </source> </entry> <entrydn="uid=...,ou=Users,dc=Example,dc=com"> <oc>person</oc> <oc>organizationalPerson</oc> <oc>inetOrgPerson</oc> mapping <at name="uid" rdn="true"> <variable>LDAP1.uid</variable> </at> reverse mapping <source name="LDAP1"> <source-name>LDAP1</source-name> <field name="uid"> <variable>uid</variable> </field> </source> </entry>
Example 9.1. Merging User Database and LDAP Entries into a Virtual Directory
IMPORTANT
Always restart Penrose Server after editing the configuration file. For example:
service vd-server restart
9.3. Configuring Basic Mapping
Basic mapping is a direct connection between one attribute in the virtual directory and one attribute on a source. There are two parts to any mapping: configuring the mapping between the virtual directory attribute and the source and then mapping back from the source to the virtual directory attribute.
NOTE
For multi-valued attributes, there can be more than one attribute mapping, but only one virtual attribute and one source attribute are referenced in a mapping.
TIP
Mappings for virtual directory attributes and reverse mappings for source attributes can be configured in the directory.xml file, but more complex mappings can be configured in the mappings.xml, which allows BeanShell scripts to be called before and after mapping attributes to perform futher transformations on the virtual entry data. For more information, see Section 9.6, “Creating Advanced Mappings”.
9.3.1. Configuring Basic Mapping in Penrose Studio
To create a basic mapping in the Penrose Studio:
Double-click the subtree entry to open the entry editor in the main window.
NOTE
Mapping can be configured when a directory subtree is created or can be added to a subtree entry.
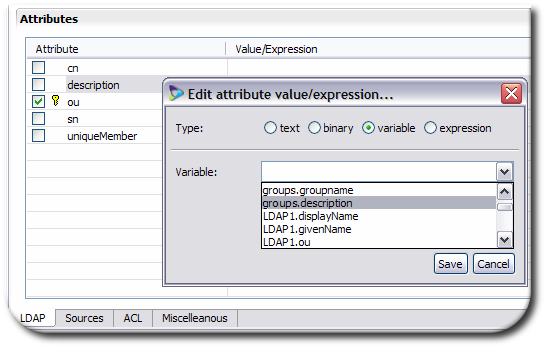
Double-click the virtual attribute to map, listed in the Attributes section of the LDAP tab.
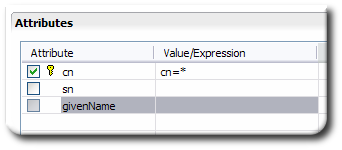
Select the radio button for how the value will be supplied. text sets an exact value, variable allows you to choose from all attributes configured for the virtual directory sources, and expression accepts BeanShell scripts.

In the subtree editor window, open the Sources tab, and, if there is more than one source, select the correct source tab at the top of the section.
Double-click the corresponding source attribute in the list.
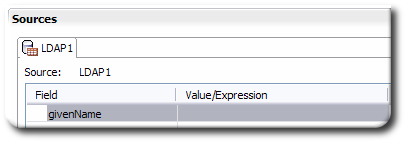
If the attribute is not listed, click the Add field link at the bottom, and add the attribute, then select it.
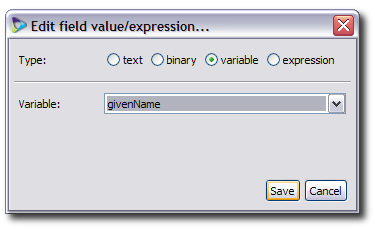
Select the radio button for how the value will be supplied. text sets an exact value, variable includes the attributes configured for all virtual directory sources as well as the virtual directory itself, and expression accepts BeanShell scripts. For both variable and theexpression scripts, make sure that the attribute referenced is the virtual directory attribute.
Close the editor window and save the changes when prompted.
9.3.2. Configuring Basic Mapping Manually
Configuring basic mapping manually requires adding a pair of mapping entries for the attribute to the subtree entry in the directory.xml file.
One entry adds the attribute and mapping in the subtree entry, linking back to the source
The other entry adds a reverse mapping in the source description for the subtree, linking back to the virtual directory attribute
The first entry is an attribute entry (<at>) in the subtree definition. The attribute requires the name argument to identify the LDAP attribute and then a mapping entry to link it back to the source. The mapping tags and parameters are listed in Table 8.1, “Parameters for Subtree Entries”.
For example, to map the givenName attribute to the JDBC1 source attribute, add these lines to the subtree entry:
<entry dn="ou=people,dc=example,dc=com">
      <at>
           <variable>JDBC1.firstname</variable>
      </at>
...
The second entry is a reverse mapping (<field>) within the source definition in the subtree. Like the <at> attribute, the <field> is a mapping entry which uses the name argument to identify the source attribute and then a mapping entry linking it back to the virtual directory.
For example, to map the firstname attribute in the database back to the virtual directory's givenName attribute, add these lines to the subtree entry:
<source>
...
      <field name="firstname">
           <variable>givenName</variable>
      </field>
...
</source>
IMPORTANT
Always restart Penrose Server after editing the configuration file. For example:
service vd-server restart
9.4. Configuring Nested Mapping
Nested mapping is a way of embedding a dynamic subtree under another dynamic subtree. The child subtree can inherit entries from its parent, even though both subtrees can have different sources. This is one way to organize information from different sources. The DN of the nested mapping will have two dynamic components:
dn="uid=...,cn=...,ou=Locations,dc=Example,dc=com"
This can be useful to group entries and simplify the relationships between different sources. For example, Example Corp. has three database tables used by their resources group:
users contains a complete list of user information, including their usernames, first names, and last names.
officepeople contains a list of office locations and their members' usernames.
offices contains a complete list of office details, including the locations and descriptions.
The virtual directory is organization to contain two subtrees: one for users and one for locations. The hierarchy can be arranged so that the users are grouped by their location, meaning that the users subtree is a child of the location subtree.
The key to configuring the nested mapping is in selecting the right attribute mapping and reverse mapping, as illustrated in Figure 9.6, “Example Nested Mapping”. The parent is the locations subtree. The office information is linked to the officepeople database through the location attribute, which both the offices and officepeople table share; the user information is pulled into the entry through the username attribute which both the officepeople and users tables share.
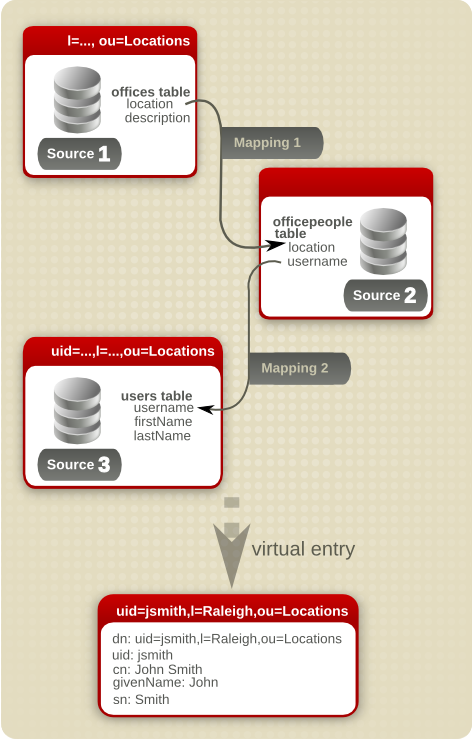
Figure 9.6. Example Nested Mapping
TIP
Mappings for virtual directory attributes and reverse mappings for source attributes can be configured in the directory.xml file, but more complex mappings can be configured in the mappings.xml, which allows BeanShell scripts to be called before and after mapping attributes to perform futher transformations on the virtual entry data. For more information, see Section 9.6, “Creating Advanced Mappings”.
9.4.1. Creating a Nested Mapping in Penrose Studio
For the nested mapping example, there are three entries which need defined:
A directory entry, source entry, and mapping for the
officestable which defines the location.A directory entry, source entry, and mapping for the
userstable which defines the username and other user attributes.A source entry and mapping for the
officepeopletable which links to the username in theuserstable and the location in theofficestable.
To create a nested mapping:
Open the Directory folder.
Create a static entry for
ou=Locations, as in Section 8.2.1.2, “Adding a Static Directory Entry”.Create a dynamic entry for the location subtree, as in Section 8.2.1.3, “Adding a Dynamic Directory Entry”.
Add the
officetable as a source.Set the naming attribute to the
land the object class tolocality.Map the the
lattribute in the virtual entry to to theofficesentry in theofficestable.Map the the
descriptionattribute in the virtual entry to to thedescriptionentry in theofficestable.
Open the Sources folder, and double-click the
offices's source. Edit the source's fields to create reverse mappings on the source from theofficesanddescriptionattributes back to thelanddescriptionattributes in theofficestable, respectively.For more information on creating reverse mappings on sources, see Section 7.3, “Creating and Editing Sources Manually”.
Right-click the dynamic
l=...subtree in the virtual directory, and create a dynamic subtree underneath it for the user entries, as in Section 8.2.1.3, “Adding a Dynamic Directory Entry”.Add the
userstable as a source.Set the naming attribute to the
uidand the object class toinetorgperson.Map the
uidattribute in the virtual entry to theusernameattribute in theofficepeopletable.Create the
cnattribute in the virtual entry from thefirstnameandlastnameattributes in theuserstable.Map the
surnameattribute in the virtual entry to thelastnameattribute in theuserstable.
Open the Sources folder, and double-click the
users's source. Edit the fields to create reverse mappings from the table'sfirstnameandlastnameattributes back to thecn,givenname, andsurnameattributes, respectively.For more information on creating reverse mappings on sources, see Section 7.3, “Creating and Editing Sources Manually”.
In the Sources folder, double-click the
officepeople's source, and edit it to create reverse mappings from the table'susernameand andofficesattributes to theuidandlattributes, respectively.For more information on creating reverse mappings on sources, see Section 7.3, “Creating and Editing Sources Manually”.
9.4.2. Creating a Nested Mapping Manually
To create a nested mapping, create two dynamic subtrees in the directory.xml file, one beneath the other in the directory hierarchy. The different tag and parameter values are listed in Table 8.1, “Parameters for Subtree Entries”.
Create a directory entry and source for the
officestable. Two attributes, theofficesanddescriptionattributes, are mapped to thelanddescriptionattributes in the virtual entry. A reverse mapping is given mapping the attributes back to the virtual directory.<entry dn="
l=...,ou=Locations,dc=Example,dc=com"> <oc>locality</oc> <at name="l" rdn="true"> <variable>offices.offices</variable> </at> <at name="description"> <variable>offices.description</variable> </at> <source name="offices"> <source-name>offices</source-name> <field name="offices"> <expression>l</expression> </field> <field name="description"> <expression>description</expression> </field> </source> </entry>This defines the entry beneath the
ou=Locationssubtree.Create the directory entry and source for the users entries. This information is taken from the
userstable. The mapping takes the username from theofficepeopletable for the virtual entry'suidattribute and the first and last names from the user's entry in theuserstable.Also provide a reverse mapping from the
userstable attributes back to theofficepeopletable'susernameattribute and to the other user information in theuserstable.<entry dn="
uid=...,l=...,ou=Locations,dc=Example,dc=com"> <oc>person</oc> <oc>inetOrgPerson</oc> <at name="uid" rdn="true"> <variable>officepeople.username</variable> </at> <at name="cn"> <expression> if (users == void || users == null) return null; return users.firstName+" "+users.lastName; </expression> </at> <at name="sn"> <variable>users.lastName</variable> </at> <source name="users"> <source-name>users</source-name> <field name="username"> <variable>ug.username</variable> </field> <field name="firstName"> <expression> if (cn == void || cn == null) return null; int i = cn.lastIndexOf(" "); return cn.substring(0, i); </expression> </field> <field name="lastName"> <expression> if (cn == void || cn == null) return null; int i = cn.lastIndexOf(" "); return cn.substring(i+1); </expression> </field> </source> </entry>Lastly, define a reverse mapping for the
officepeopletable which links it back to thelattribute value drawn from theofficestable.<entry dn="
uid=...,l=...,ou=Locations,dc=Example,dc=com"> <source name="officepeople"> <source-name>officepeople</source-name> <field name="l"> <variable>offices.l</variable> </field> <field name="username"> <variable>uid</variable> </field> </source> </entry>Restart Penrose Server. For example:
service vd-server restart
IMPORTANT
Always restart Penrose Server after editing the configuration file.
9.5. Joining Entities into a Single Virtual Entry
The same identity can have entries in multiple sources. Join mapping combines all of those separate entries into a single virtual entry. Basic mappings relate attributes to attributes; a join mapping combines entries. This joining is possible by using a primary key; this is a shared attribute value which is matched among all of the sources. If a source entry has that key, then it is included in the joined virtual entry; if not, it is skipped.
TIP
Mappings for virtual directory attributes and reverse mappings for source attributes can be configured in the directory.xml file, but more complex mappings can be configured in the mappings.xml, which allows BeanShell scripts to be called before and after mapping attributes to perform futher transformations on the virtual entry data. For more information, see Section 9.6, “Creating Advanced Mappings”.
9.5.1. Setting up Join Mapping in Penrose Studio
Joining entries in Penrose Studio is the same process as creating a basic mapping in Section 9.3, “Configuring Basic Mapping”. The difference is from what sources the attributes are pulled. The different mappings, however, reflect different attributes from different sources, and all of the sources need a reverse mapping back to the entry. Another important distinction: the reverse mappings on some of the sources map back to the primary source, not to the virtual entry, in order to map the primary keys.
For example, Example Company has two databases which contain group information. The groups database contains the name of the group (groupname) and the description (description). The users database contains all of the user information, including the username (username) and a list of each group to which the user belongs (groupname).
In this case, the primary key is the groupname attribute, which is present in both databases. The primary source is whichever source is considered authoritative for the primary key. This is the source which all other sources reference in the reverse mapping back to the primary key. In this case, this is obviously the groups database. In other situations, this can be arbitrary, meaning whichever source is best suited as being a source. So, if an employee has entries in a database, NIS server, LDAP server, and Active Directory domain, any of those sources can be selected as the primary source.
To create the join mapping for the group in Penrose Studio:
Open the subtree entry editor. In this case, the subtree is a dynamic subtree for Example Company groups,
cn=...,ou=Groups,dc=example,dc=com.For Example Company's group entry, there are four LDAP attributes which will be mapped:
cnattribute for the for thegroupnamedatabase attribute in thegroupsdatabase, to supply the entry DNdescriptionattribute for the group description from thegroupsdatabaseuniqueMemberattribute for the list of members contained in thegroupnameattribute in theusersdatabaseuidattribute for theusernamedatabase attribute in theusersdatabase
NOTE
The sources must all already be configured for the directory subtree. To configure sources, see Chapter 7, Configuring Data Sources.
First, configure the basic mapping between the virtual directory attributes and the sources. In the Attributes tab, select the attributes and assign them to the appropriate database attribute.
TIP
The format of Example Company's
uniqueNamevalues isuid=username,ou=people,dc=example,dc=com. To configure that, theuniqueNamevalue is an expression which builds the DN from the database'susername: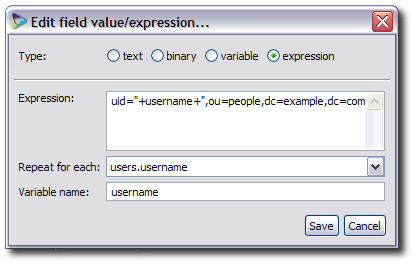
Open the Sources tab for the subtree entry.
Configure the reverse mapping for the primary source. In this case, the primary source is the
groupsdatabase.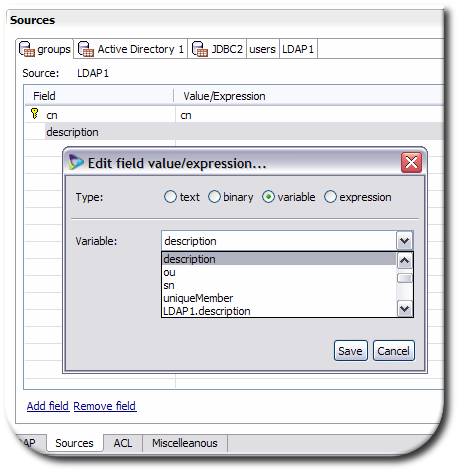
The primary key is the
groupnameattribute. Map the primary key back to the corresponding virtual directory attribute, which iscn.Map the
descriptionattribute back to the virtual directory attribute,description.
NOTE
Variables have the format source_name.attribute. If there is no source given, the attribute belongs to the virtual directory.
On the
usersdatabase source, map the existinggroupnamedatabase attribute to the primary key attribute on thegroupssource.
IMPORTANT
Map the primary key to the primary source for every source being joined.
On the
usersdatabase source, configure the basic mapping for theusernamedatabase attribute to theuniqueMemberattribute.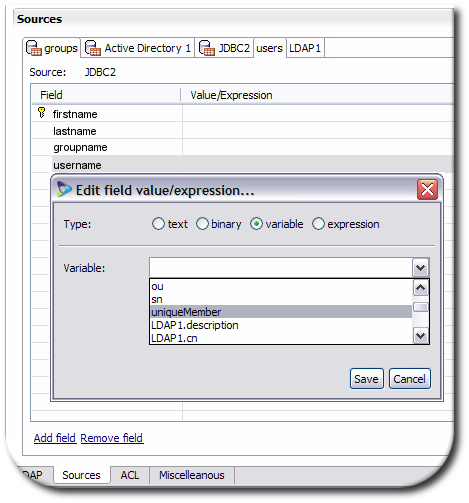
Close the editor window and save the changes when prompted.
9.5.2. Manually Joining Entries
Join mapping is configured in the directory.xml file. For each attribute, a <at> expression is added to the subtree and then reverse mappings are added to every source which is involved in the joining. Additionally, reverse mappings are added to every source linking back to the primary key in the primary source. If an entry does not have an exact match to the primary key in the primary source, then that entry is not included in the joined entry.
Joining entries can consolidate scattered entries which refer to a single person or entity. Example Company, for instance, stores group names and descriptions in the groups database, and group members are determined by the group attribute on user entries in the users database. The common key in both of those databases is the groupname attribute; in the groups database, this identifies the group; in the users database, it shows group membership. Example Company wants to create a single group entry in the virtual directory which contains the group definition and the members list.
Mapping the
groupnameattribute in thegroupsdatabase to thecnattribute in the entry to generate the DN for the groupMapping the
descriptionattribute in thegroupsdatabase to thedescriptionattribute in the virtual entryMapping the
usernameattribute in theusersdatabase to theuniqueMemberattribute in the virtual entry to create the list of group membersMapping the
groupnameattribute for theusersdatabase source to thegroupnameattribute in thegroupsdatabase source since this primary, shared key is how the entries are recognized, mapped, and merged into the virtual entry
To join entries manually, edit the subtree entry in the directory.xml file. The different tag and parameter values are listed in Table 8.1, “Parameters for Subtree Entries”.
Add the attributes to be mapped to the main entry. For Example Company's group mapping:
<entry dn="cn="...",dc=ou=Groups,dc=example,dc=com">
     <at name="cn" rdn="true">
          <variable>groups.groupname</variable>
     </at>
     <at name="description">
          <variable>groups.description</variable>
     </at>
     <at name="uniqueMember">
          <expression foreach="users.username" var="username">
                "uid="+username+",ou=Users,dc=Example,dc=com"
           </expression>
     </at>
In the source entry for the
groupsdatabase, add the reverse mapping for thecnanddescriptionattributes:<source> <source-name>groups</source-name> ... <field name="groupname"> <variable>cn</variable> </field> <field name="description"> <variable>description</variable> </field> ... </source>NOTE
Variables have the format source_name.attribute. If there is no source given, the attribute belongs to the virtual directory.
In the source entry for the
usersdatabase, add the reverse mapping for theuniqueMemberattributes:<source> <source-name>users</source-name> ... <field name="username"> <variable>uniqueMember</variable> </field> ... </source>Add the mapping from the
usersdatabase to the primary key in thegroupsdatabase, thegroupnameattributes. This is required for Penrose Virtual Directory to recognize which database entries are to be joined. Any user entry with a matching group entry will be mapped into the group members' list.<source> <source-name>users</source-name> ... <field name="groupname"> <variable>groups.groupname</variable> </field> ... </source>Restart the Penrose Server.
service vd-server restart
IMPORTANT
Always restart Penrose Server after editing the configuration file.
9.6. Creating Advanced Mappings
The format of advanced mappings is similar to the format of a source reverse mapping. The mapping is configured in fields which identify the attribute and a matching rule of some kind. Advanced mappings can also set whether the attribute is required to be present in the entry, conditions which must be met to evaluate the attribute, and scripts which can be run before or after the attributes are processed.
Mapping plays a very important role in identity federation because mapping is the way that the directory structure of the federated directory is defined, functioning as the object class and attribute declarations in the directory.xml configuration.
For identity federation, mappings are processed when local identities are imported into the global repository.
9.6.1. Mapping Attribute Fields
To create a new mapping in Penrose Studio:
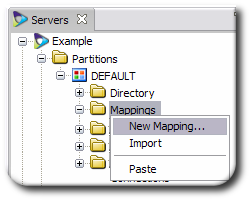
Open the server entry in Penrose Studio, and expand the Partitions folder.
Right-click the Mappings folder, and select New Mapping....
Name the mapping, and, optionally, give a description for it.

Create a mapping for each object class which will be available to the global entries.
Click the Add button.
For an object class, enter the attribute name
objectclass.
For the object classes, select the text radio button to set an exact value, and enter the name of the object class.

Select the Required checkbox so that object class is required for the global entry, and click finish.

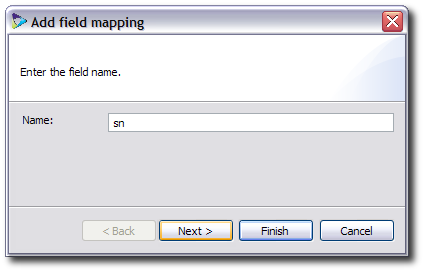
Create a mapping for each attribute which will be available to the global entries.
Click the Add button.
Enter the name of the attribute.
For the attributes, select the variable radio button to use a value from one of the repositories, and enter the value in the form repo_name.attribute.
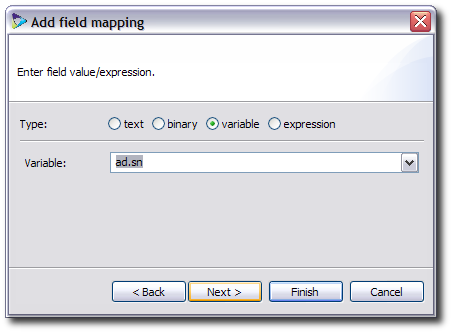
Un-check the Required box and enter the conditions where the attribute is to be processed. For example, to control the behavior of Penrose Virtual Directory if an attribute is empty, use a condition such as
!ad.sn.equals("NULL")to skip thesnattribute in the repository namedadif there is no value set.
NOTE
There can be more than one mapping configured for any attribute. The order that the attributes are listed is the order which they are processed; if one attribute mapping is skipped, the value is taken from the next attribute listed.
This attribute preference makes it possible to configure mapping even for single-valued attributes to every source. For example, the first instance can be taken from the global repository; if the attribute does not exist there, it can be taken from the Active Directory local repository, then from the Red Hat Directory Server repository, then from the NIS repository, until an attribute value is found.
Save the new mapping entry.
9.6.2. Using Scripts
Identity federation mappings allow scripts to be run before and after attributes are processed. These scripts can be used to transform, manipulate, or evaluate data in the repositories before being accessed. The only scripting language allowed is BeanShell, which cleanly handles Java objects, including the MBeans that make up Penrose Virtual Directory objects.
To add a script to a mapping:
Open the Mappings folder under the Partitions folder.
Double-click the mapping entry to open the entry editor.
Click the Scripts tag.
Paste in the BeanShell script in the Pre-Script or Post-Script text area.

Close the editor, and save the changes when prompted.
For more information on using and writing scripts in BeanShell, see the BeanShell user documentation at http://www.beanshell.org/manual/bshmanual.html.
9.6.3. Mapping Attribute Fields and Scripts Manually
To configure a similar mapping manually, add a mapping entry for each object class and a mapping entry for each attribute to the mappings.xml file. The mapping file, like a source entry for a virtual directory configuration, provides mappings between the global and local repositories by creating <field> statements. The <field>s are processed in order, from top to bottom. A mapping is illustrated in Example 9.2, “Annotated Mapping Entry”.
IMPORTANT
Always restart Penrose Server after editing the configuration file. For example:
service vd-server restart
<mappings>  the main tag for the entire file
...
  <mapping name="..."> the mapping entry
      <field name="..." required="..."> an attribute entry with the LDAP name
          <mapping_type>...</mapping_type>  the mapping definition for the attribute
           <condition>...</condition> a BeanShell script that sets rules on processing attributes
      </field>
      <pre>  an optional BeanShell script, run before attributes are processed
           ....
      </pre>
      <post> an optional BeanShell script, run after attributes are processed
           ....
      </post>
  </mapping>
...
</mappings>
Example 9.2. Annotated Mapping Entry
For example, to create a mapping for the inetorgperson object class in the global repository and the sn attribute in an Active Directory local repository, two fields are added to the mapping. The <pre> script extracts the cn, givenName, and sn attributes from the gecos attribute in the NIS server before processing the attribute fields.
<mappings>
...
     <mapping name="example">
           <field name="objectclass" required="true">
                   <constant>inetorgperson</constant>
           </field>
           <field name="sn">
                   <variable>ad.sn</variable>
                   <condition>!ad.sn.equals("NULL")</condition>
           </field>
           <pre>
                    if(n == void || n == null) return;
                    if(n.gecos == void || nis.gecos== null) return;

                    int i = nis.gecos.indexOf("");
                    if (i<0)i = nis.gecos.length();
                    String name = nis.gecos.substring(0,i);

                    int j = name.indexOf("");
                    if (j<0) return;

                    if(n.givenName == void || nis.givenName == null) nis.givenName = name.substring(0,j);
                    if(n.sn == void || nis.sn == null) nis.sn = name.substring(j+1);
                    if(n.cn == void || nis.cn == null) nis.cn = nis.givenName+""+n.sn;
           </pre>
     </mapping>
...
</mappings>
The parameters and tags for the mappings.xml file are listed in Table 9.1, “Parameters for Mapping Entries”.
| Tag or Parameter | Description | Example | ||
|---|---|---|---|---|
| <mapping> | Opens and closes the entire mapping entry. | |||
| <field> |
Defines a reverse mapping from a source attribute to a virtual entry attribute. Like the <at> mapping, this has a name> parameter to identify the virtual entry's LDAP attribute and a sub-tag which defines the mapping from the source attribute to the virtual attribute: constant, variable, or expression.
|
<field name="cn"> <variable>global.cn</variable> </field> | ||
| name="attribute" |
|
<field
| ||
| <mapping_type> |
These are any of three sub-tags which are used with a <field> tag to define the method of mapping attributes:
|
<variable>LDAP1.cn</variable> | ||
| <condition> | Defines any conditions which must be met to process the mapping, such as how to handle null attributes. |
<condition>!ad.sn.equals("NULL")</condition>
| ||
| <pre> | Contains a BeanShell script to run before the attribute mappings are processed. |
<pre> if(n.givenName == void || nis.givenName == null) nis.givenName = name.substring(0,j); if(n.sn == void || nis.sn == null) nis.sn = name.substring(j+1); if(n.cn == void || nis.cn == null) nis.cn = nis.givenName+""+n.sn; </pre> | ||
| <post> | Contains a BeanShell script to run after the attribute mappings are processed. | |||
| <description> | Contains a text description of the mapping. |
<description>for generating cn values</description> | ||
| <mapping-class> | Gives a Java class to use for the mapping. |